
The Workflow control is an evolution of the checklist. It presents the steps needed to examine a particular plan type, and is highly interactive and information rich. Since it is a primary tool for PlanTest decision making, it is important to understand both the visual feedback it provides and the actions you can perform.
The Workflow control uses a hierarchical tree structure where steps are represented as leaf nodes, and groups as the nodes above them. Groups serve only organizational purposes; the steps are fundamental.
The workflow is created dynamically from a custom workflow file selected for the plan type of the submitted data file. The window title and the root node both indicate the workflow type in use.

Only leaf nodes of the tree represent steps. Steps can be bound to an analytic test, or be unbound, and represent a visual or manual step. Parent nodes in the tree represent groups and are used for visual feedback on status of the group.

You can quickly assess the status of the examination using visual clues.
There are two visual clues on decision status: the text color and the checkbox status of each step.
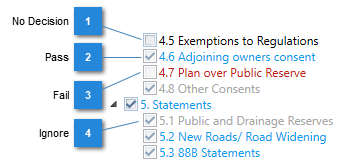
Group node represent the group status:


Group node visual clues help when the workflow is extensive, and the branch of the tree is collapsed. You can collapse groups when they are completed to make it easier to view remaining steps.
To make it easier to work with extensive workflows, you can collapse or expand any tree branch.
Selection of a step (click on text) always loads step specific data into the Test Results window.
Selection of step's text will load any prior results, comments or decision into the Test Results window. The same can be accomplished by selection of a row of the table in the Results and Decisions window, or from the Examination Review window's table.
 text to right of checkbox.
If you want to add comments to a check only decision, perhaps to say why it failed, you can use selection to open the Test Results window, then add comments there.
If a step has an associated test method, you can run the test by double clicking the text of the leaf node. From that point you must use the Test Results window controls to review, investigate and make decisions.
text to right of checkbox.Generally, as long as the data is the same you can re-run tests without a change in the results. If you are cautious, you can always turn off recording before you run the test.