
The Options menu contains settings which users may change at any time to further customize their use of PlanTest. Application Settings allow users to change the functionality of the software for examination and investigation. Theme settings and options allow for customization of PlanTest's visual appearance to suit users' personal preference.
These options control the behavior of PlanTest at a high level.

PlanTest 4.0 introduced a new title bar menu that reduces wasted screen space. The default menu splits the Options and Layout menus to the right, with all examination menus to the left. Selecting the classic menu puts these menus on the left as well, following older menu styles.

This option will preserve the current layout across PlanTest examination sessions. Any changes made to layout or options will be saved on closing and restored on startup.
The Main Map toolbars are on the application toolbar by default, to save screen space. This option moves the toolbars to the main map, making them closer to the map, especially if you move the main map to a location away from the main toolbar. (See image below for example of toolbars on the main map.)
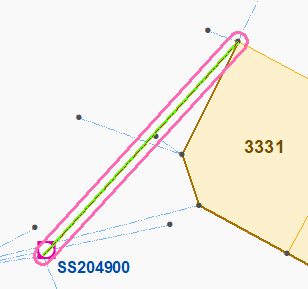
If you have the inset map open, this option will draw a blue outline of the inset map on the main map. This is useful to help locate the inset map location when zoomed in, especially if you have selected auto-zoom behavior for the inset map, and are navigating features from the test results table or looping through "Next Error".
 [image of map showing inset extent]
These settings control how the map reacts to events, such as selecting a record in a Test Results table, or what to do after a test has finished.

This option will pan the map to bring a feature of interest into view. It will only zoom the map if necessary to bring all of the feature into the view. Like the other options here, it is triggered when you select a table record, or choose "Next Error". The best thing about this option is that it does not zoom the map unless it is necessary, thus making it easier to track features. Zooming an be disorienting, especially if you are working with controls or points.
[could have a video capture to show effect]
This option will surround a map feature with an outline to make it easy to identify. It is triggered when you select a row in the result table or select the "Next Error" button. The outline persists until you make another selection or choose the "Clear Graphics" button.
When you select a record in a test results table, or click on "Next Error", this option will flash the specific feature related to that record. Flash means to temporarily show a different drawing color for the feature, so you can easily locate it.
[video?]
Some analytic tests product a selection of features that are of concern or interest. This option will zoom the map to the extent of any selection.
Progress windows show details of processing for both data loading and analysis processing. These progress windows show the steps and time of execution to give an indication of both progress and effort. you can use them to determine problems with certain data sets. Some sites have extensive loading processes, and the progress window can be used to determine issues with loading, or entertain you at least. You can turn them on or off.

Note: In most PlanTest production, data is loaded from a job control or scripted command line use, also using startup parameters to execute a full run of all automated tests . Therefore, data loading or test execution using the PlanTest menus is unusual and mainly for testing or for a specific case. We use the term ad hoc to describe such use.;
When PlanTest is started from job control, or the command line, data loading occurs prior to the initialization of the PlanTest UI and framework. This allows for data context signals to modify the PlanTest configuration. For some sites this is essential. You can toggle the progress window, but in most cases you will probably leave it on to gather feedback on the loading.
If auto-run is indicated in the startup parameters, PlanTest will perform a complete execution of all pertinent analytic tests once the data is loaded and the application UI is initiated - including the map loads. The progress window will give an excellent feedback on the detailed execution of all tests, allowing you to see problems prior to inspecting the test results.
Ad hoc data loading is a data load in-session using the Import menu. You may elect to show the Progress Window with this option.
Ad hoc analysis execution of all automated tests refers to arbitrary in-session execution using the Analysis menu. You may elect to show the Progress Window with this option.
You can elect to have the Progress Window close automatically when the tasks are complete.
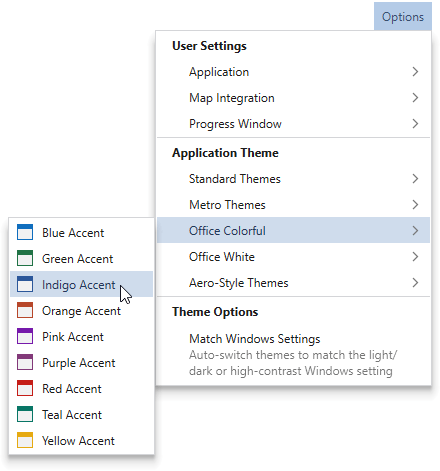
PlanTest 4.0 introduces more dynamic styling and an extensive selection of themes from which you can choose. Several families of themes are available: Standard Windows themes, Metro style themes, Microsoft Office themes and the older Aero style themes first introduced in Windows 7.
Find the style and colors you like best, or that suite your situation or mood. We use the Office Colorful Indigo Accent as the default theme for PlanTest and the images in this manual. That does not mean it is the best. We work a lot in dark mode when coding, because colors and contrast in text are better. However, we often use different light mode color accents just for a bit of variety.
Standard and Metro themes include dark mode themes. In low light conditions, dark mode screens are easier on the eyes (better contrast, improved readability of text, reduced eye fatigue, less blue light). In bright light conditions, dark mode screens can suffer from increased reflections and glare. In recent years, dark mode has become quite popular, especially with those who work remotely or at night. Some people love dark mode, some don't. Our experience is that it depends on the situation. Oh, dark mode significantly saves on battery power, and is really useful when traveling.

Our Preference - We prefer Metro Dark for dark mode as it has a thin blue outline for the windows. Without the outline, as in Standard Dark, overlap between windows can be difficult to see, leading to mistakes. This is even more pronounced in the "Black" themes.
If you switch Windows themes between light and dark, or even high contrast, then you may prefer to use the "Match Windows Settings" option. This will ensure your desktop and PlanTest are using the same theme.
High Contrast! Windows has a preference setting for high contrast mode. NOT DEVELOPMENT COMPLETE!. Need to set up for map, and the CSS switching. All other controls work as expected.