This is a short document to discuss PlanTest 4.0 Help editing in Markdown Monster (MM). We will keep any markdown editing customization issues to a minimum. We should focus on the topic document in Markdown (md), and not worry too much about testing the HTML in the Seaconis Help app.
Some abbreviations make it easier to write quickly.
(Example of how to use mm pipe tables. Notice that leading and trailing pipes not required.)
| Abbreviation | Description |
| ----- | -------------- |
|MM  |	Markdown Monster |
|md   | Markdown (the language)   |
|fa   | FontAwesome fonts for icons
|Axo  | Axosoft
|html  | HTML (hate to capitalize)
| Abbreviation | Description |
|---|---|
| MM | Markdown Monster |
| md | Markdown (the language) |
| fa | FontAwesome fonts for icons |
| Axo | Axosoft |
| html | HTML (hate to capitalize) |
HTML Reference - https://developer.mozilla.org/en-US/docs/Web/HTML/Element
Markdown Reference - https://www.markdownguide.org/basic-syntax/
"---" - horizontal line, make sure you have an empty line before and after.
"@"+icon-name - FontAwesome fonts for icons short form.
">" - blockquote element.
`
>This could be used instead of callout class for first writings.
This could be used instead of callout class for first writings. We could then come through the doc and style with the different colors of the callout. We added MM's css for blockquote, but we can style it to look like just a blue callout.
In this document we use fenced code so we can render markdown and other languages without MM parsing. You can also use backticks to "bracket" inline code.
Fenced code will display without parsing by MM. The language can be specified for special syntax highlighting. In the md you have to escape the escape fencing to show it. MM doc has good section on fencing code.
```html
<footer class='site-footer mts'>
<p class='site-footer__copyright'>
© 2020 Seaconis, Inc.<br>
Made by wilks <i class='fa fa-flask'></i> in Quarantine, California.
</p>
</footer>
```
Note: FontAwesome using the "@" method will parse and show icon even when fenced. You can use the HTML method above if you really need to.
If you want to embed code in the middle of a paragraph of text to highlight a coding syntax or class/member name you can use inline code syntax:
Inline code or member references like `SomeMethod()` can be codified...
Inline code or member references like SomeMethod() can be codified... You can use the '{}'** menu or Ctrl-` to embed inline code. (from MM doc)
The reference here is to ways to insert a snippet.
Insert key combos using just the HTML. Really easy.
<kbd>Ctrl</kbd> + <kbd>Shift</kbd> + <kbd>R</kbd>
Ctrl + Shift + R
You can also use FontAwesome (fa) icons using "@" followed by icon-name
Select the settings button <kbd> </kbd> to really mess things up.
Select the settings button to really mess things up.
The easy way using nice FontAwesome fonts is like this:
*Options Unnecessary Workflow*
Options Unnecessary Workflow
To give the same styling as Axosoft, you add the class attribute like this:
*Options Unnecessary Workflow* {class="context-menu"}
Would this work?
But perhaps the easiest to add a context menu or multiple menu selection path like
Options Unnecessary Workflowis to use inline code with backtick fencing. Use bold or italics stars outside the backticks to change all inner text.
...or
also in this fashion Options Unnecessary Workflow inline with your text.
Notice the inline code approximates the Axo context menu css.
>..like *`Options Unnecessary Workflow`*
or below from html of axo, em styling is wrong here
Tools Fields Custom Fields
You can use more complex FontAwesome using html:
<i class="fa fa-info-circle fa-spin fa-2x" style="color: blue"></i>
Mostly, you can just select a color of call-out you want, and add a bold lead-in of whatever kind. AxoSoft mainly uses yellow for Tips, Notices, Note, Information and the like. Red is reserved for strong warnings. The last two examples use a standard tip and note call-out that add the lead-in for you.
These examples rely on HTML to set the class attribute.
**Note:** Green is seldom used.{class="callout--green"}
Note: Green is called success in Axosoft, but almost never used.
Information or warnings can use this color. Use Note: or Info: or any other leading epithet in markdown or none. Then type as you wish.
IMPORTANT: we should save this color for strong "do not recommend" or "must do" warnings
Warning! the MM Tools Settings Markdown Generic Attributes must be checked. Otherwise, Seaconis style for callouts will not work!
The next two examples use a standard tip and note call-out that adds the lead-in for you in the css styling.
This is just a tip.  You don't have to put the markdown text in quotes -
which is really nice.{class="callout--tip"}
This is just a tip. You don't have to put the markdown text in quotes - which is really nice.
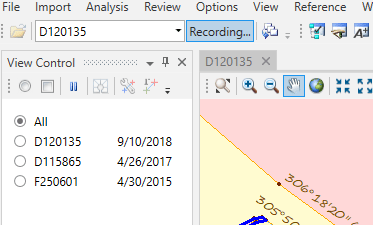
Themes are a collection of presentation aspects of a map. Views are a specific presentation for one map layer only.
This can be used make your "remains to be done " items noticeable.
End of line formatting in Markdown can be a pain. Two spaces followed by return will keep in the same paragraph. To have a end of paragraph, you need two returns, a blank line between the intended paragraphs. This is especially important in callouts because the end callout attribute requires a single paragraph.
AutoZoom - If you have AutoZoom on, the map will zoom to the selected graphic, or graphics combination.
Default - The default state of a mode is to show all graphics. If no graphics in the list are checked, all graphics are shown.
Note - Graphics lists will update if you select a different test result data set, or run a different test
There are several methods to insert using MM, just read the doc.
After Snagit capture, copy the image in the Snagit Editor and simply paste where you want it in the document. MM will prompt for where to store it. In almost all cases, move up one directory and then down to images before giving it a name.
The result will look like this:

To center images we use the style.cs class as shown below, but we need not do this while editing as we may well modify generally with a script later. The "responsive" class for images is used to develop pages that adapt to screen or app size.
 {class="img-responsive center"}

The above example, was dragged from the Help/images folder using the MM Folder Browser.
We created a CSS class to indent an image 10% of width. Could modify for other indents if needed. Note that the use of <figure> for captions below also indents somewhat.
{class="img-responsive in10pct"}

Markdown does not have support for image captions. We will use html instead as in the example below. We probably should not use many captions. If you need a blank line for spacing, use html breaks.
<br/>
<figure>
    <img src="../images/TablesSorting4.png"
         alt="Table Sorting">
    <figcaption>A table sorted on State as the primary column and Distance as the secondary.</figcaption>
</figure>

Spacing between the image and the caption may be too close if not a bit of white space at the bottom of the image. Use the Snagit editor to increase size of canvas (not change resolution) to give more space at the bottom. Unfortunately, you cannot insert html breaks, and change of CSS not optimal for other captions.
A gif can loop or play once. We don't want the animations to loop, as it is annoying when trying to read surrounding text, and we don't want it to initiate just when it comes to view. We can use two approaches to user initiated gif animation: start on click, or on mouse over. Both methods uses a 'static' single frame gif extracted from the multi-frame gif for standard display until the user interaction.
Note: the code includes inline scripts to start on the desired event. Warning! The MM settings for the editor must have AllowScriptTags as true, or the script will not run in MM, and the save to html fragment will be corrupted.
To have the gif play just once when the user clicks the image, use the following code.
</br>
<figure>
    <img src="../video/quickstartguide/StartExamStatic.gif"
    onclick="this.src='../video/quickstartguide/StartExam.gif'"
    alt="Start Examination Demo"/>
    <figcaption>How to start an examination manually. <b>(CLICK IMAGE TO START DEMO)</b></figcaption>
</figure>
</br>
The html fragment below shows how to use onmouseover to play and onmouseout and stop when mouse out.
</br>
<figure>
    <img src="../video/table/Table2MapNoLoopStatic.gif"
    onmouseover="this.src='../video/table/TableMapNav.gif'"
    onmouseout="this.src='../video/table/TableMapNavStatic.gif'" alt="Table to Map"/>
    <figcaption>Animation - Table record selection navigates to associated feature on map. <b>(HOVER TO ANIMATE)</b></figcaption>
</figure>
</br>

Warning! The MM settings for the editor must have AllowScriptTags as true, or the script will not run, and the save html fragment will be corrupted.
Use the GNU GIMP editor to extract the a single frame from the multi-frame animated gif. Just load the gif, make the frame you want active and the Export the frame to a new file. See https://logosbynick.com/edit-an-animated-gif-with-gimp/ Exporting An Animated GIF with GIMP.
For an svg, you need to enter the path to the file manually
Our svg button icon svg's can be used in-line  like this!
Our svg button icon svg's can be used in-line  like this!
comparing the svg to the png
svg vs png 
If you want to change the size of an image, you can use html, but markdown does not have support for it.
If you have an SVG...

<img src="../images/IntersectingLine.svg">
The first use is markdown, the second html. For our Icons, just set the width in the html like this.
<img src="../svg/IntersectingLine.svg" width="64">


We use Inkscape for most SVG creation and editing. However, if you use the Inkscape file directly it may be missing important bits and have some cruft not useful in the MM md docs. The header does not contain the width and height needed for some md syntax. Specifically, using the shorter versions of svg insert above, without the width="16" attribute. You need to clean it up in VS Code or whatever editor you like.
Stop! Edit only the svg in the images folder, not the original svg. There may be important stuff there needed for Inkscape editing.
All you need in the header is this
<svg
   width="16"
   height="16"
   viewBox="0 0 16 16"
   version="1.1"
   xmlns="http://www.w3.org/2000/svg"
   xmlns:svg="http://www.w3.org/2000/svg">
Here is an example of a bad header, note the missing attributes.
<svg
   viewBox="0 0 16 16"
   version="1.1"
   id="svg20"
   sodipodi:docname="CheckBoxChecked.svg"
   inkscape:version="1.1 (c68e22c387, 2021-05-23)"
   xmlns:inkscape="http://www.inkscape.org/namespaces/inkscape"
   xmlns:sodipodi="http://sodipodi.sourceforge.net/DTD/sodipodi-0.dtd"
   xmlns="http://www.w3.org/2000/svg"
   xmlns:svg="http://www.w3.org/2000/svg"
   xmlns:rdf="http://www.w3.org/1999/02/22-rdf-syntax-ns#"
   xmlns:cc="http://creativecommons.org/ns#"
   xmlns:dc="http://purl.org/dc/elements/1.1/">
  <sodipodi:namedview
     id="namedview22"
     pagecolor="#ffffff"
     bordercolor="#666666"
     borderopacity="1.0"
     inkscape:pageshadow="2"
     inkscape:pageopacity="0.0"
     inkscape:pagecheckerboard="0"
     showgrid="true"
     inkscape:zoom="50.5625"
     inkscape:cx="8"
     inkscape:cy="8"
     inkscape:window-width="1920"
     inkscape:window-height="1017"
     inkscape:window-x="1912"
     inkscape:window-y="-8"
     inkscape:window-maximized="1"
     inkscape:current-layer="svg20">
    <inkscape:grid
       type="xygrid"
       id="grid841" />
    </sodipodi:namedview>
Links between md files are easy when all in same folder For example with text Identify
[Identify](cadastral-tools-identify.md)
with SVG With svg images there can be an issue with link underline if graphic is large.
![]()
![]()
A few perhaps useful md extended syntax examples
This is an example of a ==highlighted phrase== in a sentance.
This is an example of a highlighted phrase in a sentence.
H~2~O
H2O
X^3^
X3
<i class="fa fa-info-circle fa-2x" style="color: blue"></i>.
.
MM allows fast creation of a document outline section for an md file. Sometimes an outline is good, sometimes not. Where possible, we use a short page introduction to a subject area with links to separate documents. However, some documents are long ,and stand-alone, so the document outline is better than cutting it up and using links.
Open md file and place cursor where you want the outline. The outline will only include headers below this point in the file. Select the Outline mode in the left MM panel. On its toolbar, click the (edit pencil paper icon). The outline is delimited by html comments so it will be replaced on regeneration.
You can use HTML details tags to collapse expand the outline for a cleaner look.
A disclosure widget is typically presented onscreen using a small triangle which rotates (or twists) to indicate open/closed status, with a label next to the triangle. The <summary> element is used to set the visible text when the <details> element is closed.
To make sure we can update the outline with MM, put the <details> tags outside the html comments used by MM to define the.
<details>
<summary>Document Outline</summary>
<!-- Start Document Outline -->
* [Scope](#scope)
	* [Audience](#audience)
	* [Abbreviations](#abbreviations)
* [Overview](#overview)
	* [License Operations](#license-operations)
	* [Activation History and Logging](#activation-history-and-logging)
<!-- End Document Outline -->
</details>
However, we do not currently use this as it messes with position in the js code for back and forward navigation history.
See aaa-dev-OLS-service.md for example of how it works.
This is more complicated than it should be, but we need a really clean image.
Prepare PlanTest for Menu Capture
Prepare Snagit 2022 Capture app
Action
In the Snagit Editor You can copy and paste into MM. Then save to images from there, or save to images from the editor and add into MM later. Use a reasonable name that isn't generic.
MM can save HTML as fragments, without the HTML element wrapper. This is how we consume the topic HTML within the Seaconis Help web app.
We do this for every topic md file to create the html version in the "content" folder.
We created a special application that is WebView2 based and can be in debug mode. Have not yet built an install version
The app uses the content and images folders, and has the new Seaconis axo lookalike web page and menu. It is a single web page application with JavaScript behaviors.
TODO
Important
- For radial curves, IAT uses curve chord for IA calculation.
- When more than one plan's lines have been selected, comparisons between the plans are also calculated. The most recent plan is used as the reference.
- Overlying plans with different basis of bearing will have different recorded bearings for the same line. Comparisons using Internal angles is a quick way to find actual differences.
Axo Filter-Matched Notifications uses breaks like below. To make this work in markdown, had to add as html. No way yet do lists inside, like the standard blockquote. perhaps shouLd consider a css mod for block quotes instead of separate callout close.
Important!
For radial curves, IAT uses curve chord for IA calculation.
When more than one plan's lines have been selected, comparisons between the plans are also calculated. The most recent plan is used as the reference.
`1.`Overlying plans with different basis of bearing will have different recorded bearings for the same line. Comparisons using Internal angles is a quick way to find actual differences.
These are key settings to get the preview html to show using Seaconis styles. This ensures the preview will be the same as in the Seaconis Documentation application.
Tools Settings Markdown
Generic Attributes must be checked. Otherwise, Seaconis style for callouts will not work!
Allows for attribute syntax {#id .class [color:red]} https://github.com/lunet-io/markdig/blob/master/src/Markdig.Tests/Specs/GenericAttributesSpecs.md
The Help documents are shared on Pushkin. Use these files when editing. Conflicts between editors are handled by MM (not tested yet by us)
Be sure to set autosave documents in MM settings. MM auto backup did not work when MS decided to update during dinner. perhaps because the network was closed by Windows Update first.
The Seaconis/Theme.html must have highlight css and script enabled, these are not needed in our Seaconis doc or app.
<head>
    <base href="{$docPath}" />
    <meta http-equiv="Content-Type" content="text/html; charset=utf-8">
    <meta charset="utf-8" />

    <meta http-equiv="X-UA-Compatible" content="IE=edge" />
    <link href="{$themePath}..\scripts\fontawesome\css\font-awesome.min.css" rel="stylesheet" />
    <link href="{$themePath}stylesMM.css" rel="stylesheet" />

    <script src="{$themePath}..\scripts\jquery.min.js"></script>
    <link href="{$themePath}..\Scripts\highlightjs\styles\vs2015.css" rel="stylesheet"/>
    <script src="{$themePath}..\Scripts\highlightjs\highlight.pack.js"></script>
    <!-- <script src="{$themePath}..\Scripts\highlightjs-badge.js"></script> -->
    <script src="{$themePath}..\scripts\preview.js" id="PreviewScript"></script>

    {$extraHeaders}
</head>
In the header above, link underlines not rendered, nor in table below.
Without link
![]()
![]()
![]()
![]()
![]()
![]()
Displays with link underline
![]()
![]()
![]()
![]()
![]()
![]()